So Positive
")
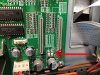
Yea I'll be sure to ground and let all the current drain. But its located in the back of the printer not front see I would figure the fuses would be located in front due to access to the printheads. I'll Check it when I get back and see what i get I did test the fuse looking items in the pictures above and everything was good.
I'm printing right now in Magenta and Yellow and cutting some white so it should be done by the time I get back.
Will update once I return.
Yes, the two small surface mount fuses are loacated on the main board in the back of the printer. If one of the two fueses is blown (open), you need to replace it.
They are very small and difficult to solder if you don't have experience with theses very small SMT electronic components. If too much heat is applied to the circuit board, you can actually cause irreversible damage to the board if the solder pad on the board comes loose and starts to curl up.
However there is another option that is better for two reasons, one is you don't have to remover the blown fuse and two, you will have the ability to replace a blown fuse in the future without any soldering.
The solution is the solder jumper wires to both sides of the blown fuse (leaving it on the board) and then attach the other ends of the wire to a FUSE HOLDER, and using the standard type of glass fuse (1.6A 125v FAST BLOW), you can easily change out the fuse if it blows again.
Taking this option makes the soldering safer because you are applying heat to the top of the old (blown) fuse which is insulating heat from the circuit board.
Attached is a pdf guide on how to do this for a different printer, however using the correct sized fuse, this will also work for the SP-540V.