• I want to thank all the members that have upgraded your accounts. I truly appreciate your support of the site monetarily. Supporting the site keeps this site up and running as a lot of work daily goes on behind the scenes. Click to Support Signs101 ...

Laminate overhang!

iPrintStuff

Prints stuff
So up until about a year ago we used to always get in 54” rolls of vinyl and 54” of laminate. No matter how straight I loaded the laminate there would always be a little sticky bit on one side.

This wasn’t a problem until we got the summa/flexa and started loading full rolls of stuff to be cut down instead of loading a sheet at a time on the mimaki to register/cut (never again! Lol)

So as from about a year ago whenever we buy vinyl, we get the lam about 1” shorter from our supplier so we can use a takeup on the laminator and not have a giant sticky mess.

Speaking to a few members, most don’t seem to know suppliers will cut down rolls for you (we get it free due to quantity but it is sometimes chargeable to other people) so that probably puts people off.

So my question is, what are you all doing about that stupid little slither of laminate? Do some of you just leave it then load the summa anyway? Do you stand with a knife and just cut it as it comes out? (I’ve been there!)
 
C

ColoPrinthead

Guest
Stand behind the laminator and cut it off with a knife before it hits the take up. I need to look into finding a solution to fix a blade to my laminator.
 

iPrintStuff

Prints stuff
Stand behind the laminator and cut it off with a knife before it hits the take up. I need to look into finding a solution to fix a blade to my laminator.

I hoped that wasn’t just me! I must’ve did that for a good few months before deciding the smaller laminate was necessary. Blunts the blades on my knives so quick as well!
 
C

ColoPrinthead

Guest
I hoped that wasn’t just me! I must’ve did that for a good few months before deciding the smaller laminate was necessary. Blunts the blades on my knives so quick as well!
usually I can just clean the adhesive off the blade, but I use a box knife. It is rare I rack much over .25" and that if fine for running through a plotter - I go a head and trim it anyway because I have to watch the machine.

I love me zen moments when everything lines up perfectly.
 

ikarasu

Active Member
We just use a knife. Some prints are right to the edge for us.. I'd rather waste a 10 cent blade than a few ft of media because it was too thin.

I can see 1" shorter rolls being handy in a lot of cases though... Come to think of it, we get a lot of 54" rolls slit to 48 for our reflective... Our reflective is 48.5" and using the 48 on it has always been so easy.

Next roll I get I'll try getting it cut to 53"! Usually crops and edge guard space is at least a quarter to half inch anyways
 

iPrintStuff

Prints stuff
Our Colorado prints AAC marks to automatically correct any banding, those marks usually take up about 1/2” either side of the roll anyway so we don’t tend to print on that area anyway.

Our main vinyl for signs comes in at 1600mm and the matching lam is 1530 for no apparent reason as well so we get a lot of give on those rolls.
 

Jester

Slow is Fast
I need to look into finding a solution to fix a blade to my laminator.
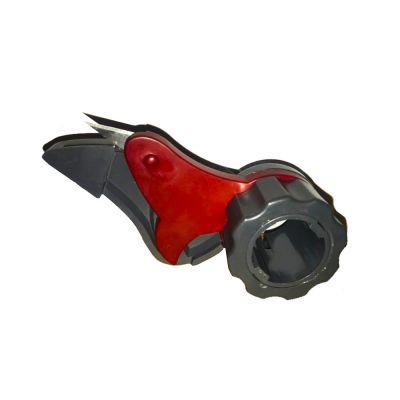
This cutter bar with four knives came on our laminator and works pretty well. It is available separately here:
https://www.sign-in-china.com/produ...inating_machine_trimmer_cutting_function.html
This is what one of the cutter heads look like:
Cutting-Knife-Trimmer-Tool-for-the-Laminating-Machine-cutting-Device1555394721-biger.jpg
 

Notarealsignguy

Arial - it's almost helvetica
I put all of the overhang on 1 side, then line it up so the vinyl is right at the edge of the takeup tube and just the laminate overhangs. Then kinda saw through it with a big olfa knife after its done using the tube as an edge guide.
If that is what you are talking about?
 

Tatonka

New Member
our Seal laminator has trimming knives that can trim off that excess. You've just got to be careful that you pull it away from the takeup or you end up with a mess.
 
C

ColoPrinthead

Guest
I put all of the overhang on 1 side, then line it up so the vinyl is right at the edge of the takeup tube and just the laminate overhangs. Then kinda saw through it with a big olfa knife after its done using the tube as an edge guide.
If that is what you are talking about?

Do you also slice away you laminator's backer paper on the take up? If you people don't know the reverse core spin method, let me know and I will take photos next time I do it. I also need to get pick and post another laminating thread about splicing when the lam runs out before the print. Do you setup your laminator by shoving a board through it - I already made a post for that.

But you will first need to book your reservation with Robert A on ZOOM!, before I can share this knowledge that will help :big laugh:
 

Notarealsignguy

Arial - it's almost helvetica
I'm lost here. He was talking about the lam being slightly wider than the print but still the same size material? Not trying to lam 48" print with 54" lam?
I web mine like mounting a sign. Drag the print in (on a takeup roll) and pull it tight, hold it with magnets. Then bring the lam over it, line it up, pull it tight and hold it with magnets. Drop the roller, take off the magnets, peel off a bit of the backing and roll it under the roller. Tape the backing that was rolled under up to the takeup, start putting it through slowly and when the print hits its takeup, tape it to the core. Then let it eat. I have virtually no waste doing it this way and it always tracks straight - even on a cheap china laminator. I don't understand the sleds and other methods but they seem to waste a lot of material.
 

iPrintStuff

Prints stuff
Reverse core spin method? Do share.
I just feed the laminator some lam with backing on, slip a bodyguard knife between the two, then pull that split up to the lam takeup reel and stick the back side to a piece of double stick.

I do this. I always have backing paper or old vinyl running through so I just load new lam, pull it out a bit, tape the middle to the backing paper that’s running through (to stop Me laminating my rollers) then pull it through ever so slightly.

after that, just cut through the backing paper without cutting the lam then attach backing paper to takeup. Easy peasy.
 
C

ColoPrinthead

Guest
I buy premask from Bron and have it cut short to mask cut vinly on my laminator, I used to work for their AeroTech division.
 

SignMeUpGraphics

Super Active Member
Thank you for that, I have a 64" RS and had been over thinking working with the existing parts!

I am buying it when I get back to work tomorrow!

We've got a 64" RS as well. Please let me know how you go with this. I've often thought of building something like this as well, but ready made beats the effort. Just curious how much fabrication will be required to add to an RS lam.
 
C

ColoPrinthead

Guest
We've got a 64" RS as well. Please let me know how you go with this. I've often thought of building something like this as well, but ready made beats the effort. Just curious how much fabrication will be required to add to an RS lam.
Will do, for our operation it is worth a shot for the cost even if it fails to deliver.
 

Notarealsignguy

Arial - it's almost helvetica
I've thought about this, but always figured I'd get a line where the lam was split. I hate those lines. Do you have this issue?
Not here, Im a pro!
I dont know what lines but I have about a 6” blank space at the start on the print and the roll under will hit before its over the print.
Its a little harder with cast and even more so with a plastic backer like 3m has. 3m’s adhesive seems a little more aggressive too so the lam stretches and looks ugly for the first 2 inches. Either way, it works good for me and it always tracks good.
 
C

ColoPrinthead

Guest
Reverse core spin method? Do share.
I just feed the laminator some lam with backing on, slip a bodyguard knife between the two, then pull that split up to the lam take up reel and stick the back side to a piece of double stick.
So when I unload the the core that rolls the backing paper off, I let the the last wrap have some slack and then toss 2 pieces of tape onto where they over lap the roll. Then I hold the paper and spin the core in the opposite direction until the tape ( that held it on to the take up) breaks and I slide/pull the core out.
 
C

ColoPrinthead

Guest
I posted this thread a few years ago, but failed to realize that is it helpful to noobs to have the top roller dropped when taping the lam to the top roller (so it doesn't move).

I will be posting a thread about splicing laminate in the middle of roll to roll laminatinng the next time I deal with it

Here is the old one:
https://signs101.com/threads/lamination-tips.139129/#post-1333303
 
Last edited by a moderator:

Bly

New Member
We try and get the alignment close then just load it in the cutter.
Nobody got time to trim all that off.
 
Top