My flushing fluid and some parts finally arrived today. Do you have any suggestions how I should use the flushing fluid to clean out the machine and hopefully try to preserve the heads. We are assuming the machine has not been run in 14-18 months and potentially sat without power for months during that time. Thank you
-
I want to thank all the members that have upgraded your accounts. I truly appreciate your support of the site monetarily. Supporting the site keeps this site up and running as a lot of work daily goes on behind the scenes. Click to Support Signs101 ...
You are using an out of date browser. It may not display this or other websites correctly.
You should upgrade or use an alternative browser.
You should upgrade or use an alternative browser.
Need help getting a used Mimaki UCJV300 running again
- Thread starter HGdesign
- Start date
I am grateful that the machine is powering up consistently and I am trying to shift most of my focus now to a through cleanup and efforts to save the heads from any damage due to dried up ink in the system due to printer sitting unused for months.Ahh, as for manually rotating the pumps, you can do it, not going to harm anything. Just beware of pinch points. Just the image showed on my phone.
My flushing solution 07, and the small bottle of Maintanec liquid 15 have arrived. Please let me know any recommendations how to check supply lines are not locked, and how to using the flushing solution to safely clean out the heads, etc.
Looking at the capping stations, the one on the left seems clean and any liquid I dropper into it, easily drains out. The capping station on the right has what looks like a layer of white ink across about 70% of the mesh. Even time I dropped liquid onto it, some appress to dissolve, but I yet to see a clean screen on the right station.
If the heads are clogged, can I end up damaging them while doing any print tests, or other operations?
Thank you
Smoke_Jaguar
Man who touches printers inappropriately.
If flushing the lines and stuff, can use rubbing alcohol to save the maintenance fluid for head washes. Right station, if using white ink, will take a long time to clean up, if it cleans up completely in general. Can take a texwipe or paper towel and dab up the ink with alcohol on the screen and use a swab to gently clean the gasket.
Gen5 heads are quite durable, so running cleaning cycles won't mess with them. If you try to inject cleaner into the lines, there's a good chance you'll nuke your subtanks however.
Gen5 heads are quite durable, so running cleaning cycles won't mess with them. If you try to inject cleaner into the lines, there's a good chance you'll nuke your subtanks however.
My machine does use LC/LM / W /W on the right head.
- Are you saying it's safe to use rubbing alcohol to actually put into the lines and subtasks?
- Do I actually flush out all the old ink somehow first?
- I have not run any cleaning cycles or print tests yet. Was wondering if there is a way to confirm the lines are not blocked and at least flowing ink first.
Thank you
Smoke_Jaguar
Man who touches printers inappropriately.
If you need to do a line flush from the ink supply side, use 1 liter bottles of Mimaki flush.
My machine does use LC/LM / W /W on the right head.
- Are you saying it's safe to use rubbing alcohol to actually put into the lines and subtasks?
- Do I actually flush out all the old ink somehow first?
- I have not run any cleaning cycles or print tests yet. Was wondering if there is a way to confirm the lines are not blocked and at least flowing ink first.
Thank you
Im so sorry to be asking stupid questions, but I am not really clear on how exactly a line flush is done. I purchased two 1-liter bottle of Maintenance Liquid 07. Hate to take up so much of your time, but is there any pdf or video of step by step process to go thru and flush the important areas. And are the manual techniques to check valves, lines, subtasks, etc. are not physically clogged if that has the potential to cause bigger problems when doing cleanings under power.If you need to do a line flush from the ink supply side, use 1 liter bottles of Mimaki flush.
- Currently I have been using a dropper to fill the capping station with the fluid and then manually parking the head back over it for the last few nights
- Each time I come back the liquid level has dropped down
- I have also done 1 "Head wash" now using the machine powered up and filled the capping station using the small bottle of Liquid #15. I then cut off the main power switch when it was costing down 1 minute and let it sit all night.
Last edited:
Smoke_Jaguar
Man who touches printers inappropriately.
If you have the electronics running good, just run a few nozzle washes. Will prompt you to clean the caps and wiper and then to fill the cap. Let the head soak and it will run a cleaning cycle. Run nozzle check, repeat. Line flushes require changing ink bottles for flush and will use a lot of ink up. If you plan on using the same ink set, cleanings are the most economical way to go.
I will try your suggestion for cleaning cycles. Does the machine do any cleaning on normal boot up or power off?If you have the electronics running good, just run a few nozzle washes. Will prompt you to clean the caps and wiper and then to fill the cap. Let the head soak and it will run a cleaning cycle. Run nozzle check, repeat. Line flushes require changing ink bottles for flush and will use a lot of ink up. If you plan on using the same ink set, cleanings are the most economical way to go.
I am open to recommendations on what is best as far as using old inks vs new. The inks that came with the machine have expiration dates from late 2022 to mid 2023. The machine was used in a facility where it was inside a large warehouse type setting and not in front of a window exposed to sunlight. I removed all the inks to transport the machine and all dripped as liquid when lifting off the bottle station.
- I do plan to keep the CMYK LcLMWW setup it came with for now. Down the road, would like to consider adding gloss to head 2 to make it ClCl/WW, but the first focus is to get it running well with current setup.
- If you think iI risk clogging and damaging then I can get new inks for it.
- If you think it's reasonable for ink that old to still run safely, I will use it and be nice to save and use up what I have first if possible
Thank you so much for all your time!
Smoke_Jaguar
Man who touches printers inappropriately.
Can cut the old ink with a bit of flush by pouring some flush straight into the bottle stations. Want to get ink flowing ASAP as it can block the lines over time (white ink and black ink can be the worst about plugging lines) and especially to get white ink flowing. If possible, pull the subtanks and pour out any white ink in the system. If you push the valves in the back of the bottle station, you can drain the lines. Age of the ink is less of an issue than stagnation.
As for adding clear, not too hard to do with a parameter change and chip/bottle swap. Just gotta run a bit of ink through the system to purge the pigments.
As for adding clear, not too hard to do with a parameter change and chip/bottle swap. Just gotta run a bit of ink through the system to purge the pigments.
You are spot-on about the black and white being the worst. I was unable to complete the cleaning cycle and tripped "ERROR 61b" Ink supply. It notes ---4--78 .I think that points to the subtanks not showing the right ink levels for the black and 2 white channels.Can cut the old ink with a bit of flush by pouring some flush straight into the bottle stations. Want to get ink flowing ASAP as it can block the lines over time (white ink and black ink can be the worst about plugging lines) and especially to get white ink flowing. If possible, pull the subtanks and pour out any white ink in the system. If you push the valves in the back of the bottle station, you can drain the lines. Age of the ink is less of an issue than stagnation.
As for adding clear, not too hard to do with a parameter change and chip/bottle swap. Just gotta run a bit of ink through the system to purge the pigments.
- # TEST / sensors, shows ---/---/--- for subtank 4, which I think is black
-- and LOW/---/---- for Subtank 7 and 8, which sounds like white
Should I completely remove and clean out the subtanks, or just remove the ink supply lines to the subtanks and manually try to see if ink can be pulled in each line using a syringe?
Is removing the subtanks challenging or require any special steps? I may need some directions if it's not in the service manual.
Thank you
Smoke_Jaguar
Man who touches printers inappropriately.
4 is black, correct.
Need to see if the line is clogged. DO NOT TRY AND CLEAN OR MANUALLY FILL SUBTANKS, it usually kills them. Unhook the line from underneath the bottle station solenoid valve and the line attached to the subtank. If you have a spare clip-style fitting, use it to gently push flush or alcohol through the line while the subtank end is in a container to catch the ink. From the solenoid valve to the subtank is a clear path, just a few 90 degree elbows and some fittings, no valves or anything. If the ink does not flow, no amount of pressure, pumping or solvents will fix this, you MUST replace the line. Something about black ink, always the one to solidify.
Need to see if the line is clogged. DO NOT TRY AND CLEAN OR MANUALLY FILL SUBTANKS, it usually kills them. Unhook the line from underneath the bottle station solenoid valve and the line attached to the subtank. If you have a spare clip-style fitting, use it to gently push flush or alcohol through the line while the subtank end is in a container to catch the ink. From the solenoid valve to the subtank is a clear path, just a few 90 degree elbows and some fittings, no valves or anything. If the ink does not flow, no amount of pressure, pumping or solvents will fix this, you MUST replace the line. Something about black ink, always the one to solidify.
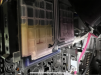
I cannot remove the wide ribbon cable plug that is blocking my access to the blank ink line at the top of subtank#1
- I was able to squeeze to unblock the side tabs, but it won't budge, and I am not sure how much force is should use to lift it, and if I can rock it back and forth to try to work it up.
- That cable blocks the connection to line #4 Black at subtank 1
Picture Attached
- I was able to squeeze to unblock the side tabs, but it won't budge, and I am not sure how much force is should use to lift it, and if I can rock it back and forth to try to work it up.
- That cable blocks the connection to line #4 Black at subtank 1
Picture Attached
Attachments

Last edited:
For the Black:4 is black, correct.
Need to see if the line is clogged. DO NOT TRY AND CLEAN OR MANUALLY FILL SUBTANKS, it usually kills them. Unhook the line from underneath the bottle station solenoid valve and the line attached to the subtank. If you have a spare clip-style fitting, use it to gently push flush or alcohol through the line while the subtank end is in a container to catch the ink. From the solenoid valve to the subtank is a clear path, just a few 90 degree elbows and some fittings, no valves or anything. If the ink does not flow, no amount of pressure, pumping or solvents will fix this, you MUST replace the line. Something about black ink, always the one to solidify.
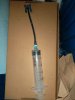
- Able to disconnect at solenoid and confirm valve drips steady when pressed
- Stuck at subtank side unable to get ribbon cable out of way to access
For the White #7
- Able to disconnect I-7 at the solenoid
- Solenoid does NOT drip when pressed ( can valve be cleaned?)
- Able to disconnect at circulation pump below and connect a syringe with this Luer fitting
- Able to disconnect I-7 at subtank as well and using the syringe able to pull ink out and flush #07 liquid thru to the subtank side
- Took photo of the side of subtank #2 with the white which looks to be a bit discolored in there.
Questions:
- Still have several lines to check, but I am not sure how to connect a syringe to the lines that have the click type fitting?
- Can any of the black fittings be removed such as an elbow, or the lure lock fitting so I can temporarily move them to another tube and test with syringe?
Thank you!
Attachments
Smoke_Jaguar
Man who touches printers inappropriately.
The clip fittings typically need very little force to disconnect, but they might need to be pushed down to help disengage them. Room above the heads is definitely tight, but if you have a spare clip connector attached to a bit of tubing and a syringe, just rotate the fitting to face up and connect to it that way. The fittings can be sourced for around $2 each, either M603012 or M603013 should work fine. If the printer came with any old subtanks, capping stations or whatever else you can scavenge one off of, they're pretty vital.
Valves dripping steady (1 drop every second or more is fine) and the ink system is vacuum assisted, so that helps ink flow even faster on a live line.
Based on the looks of your white inks, it's pretty bad looking, but not fully separated. When you get a fitting & syringe, connect to ports 9 and 10 and gently use suction to siphon up the old ink from the subtanks and dispose of it. Do not fill the subtanks with a syringe or disconnect/tilt them as there is a small fiber filter in them where the vacuum/air pressure system can adjust pressure in the tanks. If ink gets on this filter, it blocks up completely, as designed. This keeps ink out of the air lines and solenoid manifold.
If the bottle solenoids do not flow, they can be disassembled and cleaned with a Philips screwdriver. However, make sure to siphon all the ink out of the bottle tanks you can, it will be messy. The valves, M015864, are typically around $25-35 each and are considered consumable. Might be worth getting new ones.
While in the carriage, look at your air lines and solenoid valves to see if there is ink in them, part number E300918 (around $120-150) if you have to replace. If you see a blue (-) and orange (+) line on the lines, this is normal and denotes which is negative or positive.
Elbows can be disconnected but note that you will want to clip off the flared area of tubing and reinstall them in a fresh unstretched spot.
When flushing lines, do it with the subtanks DISCONNECTED. If you wish to empty a bottle station, connect to the bottom of the solenoid valve with your syringe & fitting (this is a vital tool, if you cannot tell by now). To empty a line, connect above subtank and pull from the line. Note that circulation pumps might block flow when off, so you'll need to work around those in the case of the recirculation system.
Attachments
- The ink line clip fittings come off beautifully with little force.
- It's the electrical multi-color ribbon cable for the printhead that is passing left over the top of subtank-1 that I am struggling to disconnect. It's about 2" wide with double row of wires bundled and wrapped in foam, and it covers all the ink ports above subtank-1. The 2 tabs unclip, but the connector will not budge. I feel like I might break something if I force it too much. Not sure if the picture came thru, I'm attaching it again.
Thank you so much for all the great advice. I will do my best to implement all these as I continue on this journey to refurb this machine tomorrow.
Attachments

Smoke_Jaguar
Man who touches printers inappropriately.
On the head cable pairs is usually a lockdown wedge that keeps the cable clips spread out. Sometimes it is held on by zipties and those have to be removed first.
Thank you!On the head cable pairs is usually a lockdown wedge that keeps the cable clips spread out. Sometimes it is held on by zipties and those have to be removed first.
I disconnected the black tubing from both ends and tried to suction it. Got about 8ml of ink out from supply side and nothing else.
- After repeated attempts, decided to slide a thin wire into tube. Got only about 12" into supply side and hit obstruction the does not seem to budge easily. Didn't want to force too much. I put some flushing liquid into that side for now but looks like black line is blocked.
- Is it normal to have a firm blockage? Is it worth trying to use a wire, or is that a futile attempt with it likely to be solid al the way down the tube? and just get some new tubing on order? ( my local supplier does not have in stock so looking at a few days minimum to get it)
- What is the tubing made of, and can I buy comparable material locally from tubing supplier and try to keep moving forward?
- And how difficult is to get a new line into the machine ?
Thank you
Smoke_Jaguar
Man who touches printers inappropriately.
You need new black line, plain and simple.
I have some spare if needed, otherwise it's like $110 for 10ft.
I have some spare if needed, otherwise it's like $110 for 10ft.
- Any special methods to installing it? I see some posts about puling the old one out with the new one attached.
- Local supplier is saying it will be a few days to get in. Last order ended up over a week to get.
- We do have a place that sells lab type items, and if I knew what material this is made of, I could ask them if they have the same material tubing available. Even if it was temporary to keep moving while I wait for more parts. For all I know there will be more items needed once the tube is in, possibly subtanks, etc.