• I want to thank all the members that have upgraded your accounts. I truly appreciate your support of the site monetarily. Supporting the site keeps this site up and running as a lot of work daily goes on behind the scenes. Click to Support Signs101 ...

Trimming Questions

RedlineMan

New Member
Hey All;

My last mountain to overcome was learning about the variables involved in welding. I have learned a lot about welding, and can now do so successfully.

The next thing that is puzzling me is trimming. As with welding, there seems to be certain characteristics of certain objects that will not allow a successful trim function to be completed.

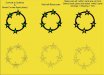
I have a graphic that has a black ring with two sets of three different size stars. The stars are white with a wide black border. The borders have been converted to objects, and then welded into the black ring. Since this is going on a white background, instead of cutting white stars I am attempting to use the exisiting white portion of the stars to trim a star shaped opening in the black star/ring background.

The problem is that some of them trim as you'd expect, but some will not. This has me a bit confused. My assumption is that something I have done in manipulating/copying the stars won't allow them to trim properly, but that is a guess.

Interestingly, when I view them in wire frame mode, I can see the star outline from the trim, but in enhanced mode, I see no outline, nor are there any nodes/vectors present.

Any clues?
 

javila

New Member
Shaping remains a "memory" of the objects used, that's why they show up in wireframe view, but not enhanced view. That's so you can go back to the original objects.

As to why some trim and some don't, it's probably a matter of having the objects in the right order.

You need to weld and/or combine the back objects. Weld and/or combine the front objects. Then trim those two "sets" for the trimming to work properly.
 

GAC05

Quit buggin' me
Can you post up the file for someone here to take a look?
It would be the quickest way to figure out what is going on.

wayne k
guam usa
 

Techman

New Member
click on the back object. select trim.. select what you want trim to do in the tick boxes.
Click on the front overlapping object. The top cuts the bottom.
 

RedlineMan

New Member
click on the back object. select trim.. select what you want trim to do in the tick boxes.
Click on the front overlapping object. The top cuts the bottom.
I'm a little lost...

The way I've done trimming is to place the item to be trimmed under the item that is doing the trimming. Select the top item, hold shift, select the bottom item (to be trimmed) and select trim, either from the tool bar, or when that is not offered, from the arrange menu. Sometimes this does not work, however.

Your scenario does not make sense to me, both in what the "tick box" is, and in the procedure. Can you clarify?

I cannot post a Corel file, can I?
 

Techman

New Member
The way I've done trimming is to place the item to be trimmed under the item that is doing the trimming.

That is the first step.
Next open Arrange/shaping select trim. This open the right panel... edite to add,, Arrange/ shaping/ shaping.. bottom selection in tha tmenu
Next, click the bottom piece.
click trim on the right panel
click the top piece.
Done.
This is very basic explanation. However, play around and it will come about.

There are other options for trimming in the right panel. select each one for each option.
No ticks and you will have the bottom cut out from the top
select "source and the bottom merges with the top plus leaves a copy of the bottom and top.
select "target and the bottom is cut by the top and leaves a copy of th etarget

Select both ticks and it will leave the bottom and the top plus a cut out of the bottom from the top
 
Last edited:

RedlineMan

New Member
[Arranging the layers...] (...) is the first step.
Next open Arrange/shaping select trim. This open the right panel
Next, click the bottom piece.
click trim on the right panel
click the top piece.
Hmmmm....

I get nothing with this order of operation, and this is what is confusing me. I have to click the top object, then hold shift, then click the bottom object, THEN select Arrange, Shaping, and Trim. Your order of operation is different and does not work for me.

I see there are many other operations within the Shaping flyout. I have not fooled with too many of them yet. Just weld and trim.

I think I am reasonably familair with how to trim items, having done it many times already. What I am confused by is some of the seemingly easy and normal trim jobs that do not work. I am assuming there are certain attributes necessary in each object for this to work right, and that is what I am trying to learn presently.
 

RedlineMan

New Member
OK;

Here's my example. The ring was made of many components all welded together to form a contiguous piece. As I recall, I made the largest star on the left, then copied it twice, resizing each successive star as a percentage of the previous one. I then positioned the three where I wanted them on the ring. I then created outlines for them, turned the outlines into objects, and then welded the outlines into the ring. I then copied the stars, flipped them horizontally, and moved the 2nd set into position on the right and followed the same outlining/welding steps for them as well.

This graphic is designed for a white background. As such, I am looking to Trim the white stars from the black vinyl ring instead of layering white vinyl stars on the black. The problems arose when I tried trimming the stars.

All the white stars you see were successfully trimmed. The green stars were trimmed the same way, but this procedure did not remove the black from behind them. Instead, it is seemingly solid black until you use the Shape tool and click on the black ring. This reveals that there is a set of nodes and vectors where the trim was done, but the black is not removed.

Why only these two? I have tried breaking the curve and removing the black star piece, but there is never one offered. In other words, the star area in the black fields is not broken out of the curve.

I hope this makes sense...... It confuses me too, hence my questions. The other stars trim fine, but these two won't. Why?
 

Attachments

  • ring.jpg
    ring.jpg
    34.8 KB · Views: 118

Techman

New Member
I have to click the top object, then hold shift,
ARe you opening the dockers panel on the right?

Also, top / bottom is only relevant to the job at hand. You can select either piece to trim with. The first selection operates on the second.

Arrange,/ shaping /shaping..Note there are two shaping selections in a row. The bottom selection.
There is NO holding of the shift button. Are you using Corel draw?

On the wreath.
Is the black outline around the star welded to the wreath? Also is ther more than one black layer beneath that art.
 

javila

New Member
Certain operations work on only two objects. Weld can work on any number of objects.

What's happening is that the trim is performing the function on two objects and ignoring the rest.

The three white stars on the right side where probably created as one single object and that allowed you to "trim" correctly. While on the left side it was still three objects and corel only saw two objects(black ring and bottom white star).

Either go one object at a time, or combine all the objects that are going to be trimmed into a single object.
 

RedlineMan

New Member
ARe you opening the dockers panel on the right?
No. We are working this in different ways. Yours is not familiar to me, and that is the cause of the confusion. Referencing the attached screen shot, this is how I get to Trim. If I have selected my two objects, the trim function is usually displayed as an icon on the tool bar (red arrow) along with Weld, Combine, Group, A-B, B-A, etc. Otherwise I have to go into the Arrange drop down as is also shown. I am unaware of getting these functions as a "flyout" or "docker."

Also, top / bottom is only relevant to the job at hand. You can select either piece to trim with. The first selection operates on the second.
Yes, indeed. I was aware of that.

Arrange,/ shaping /shaping..Note there are two shaping selections in a row. The bottom selection. There is NO holding of the shift button. Are you using Corel draw?
Again, we have different methods. I am not familiar with the way you are doing it. I only know what I've learned on my own. I'm still quite unclear as to how you are doing it, and that is causing the confusion for me. The screen shot displays all I know about this... so far.

I select the object that will do the trimming, hold Shift and select the object to be trimmed, the perform the trim. That is the only way I know how to do it.

On the wreath. Is the black outline around the star welded to the wreath? Also is ther more than one black layer beneath that art.
I am quite aware that you can be fooled by "hidden" objects. Learned that one by experience! I have looked at it in Wireframe, and also selected the "wreath" and stars individually, moved them away, and then marquis selected the entire area where they were to search for "hidden" objects underneath. The wreath is one layer, one node path, and there is nothing hidden.

I even tried the Combine and then Trim, and it did not work. I remain confused. I hope not to become tedious! :rolleyes:
 

Attachments

  • screen.jpg
    screen.jpg
    40.7 KB · Views: 101

RedlineMan

New Member
Heyt;

Indeed this is what I did, or at least learned to do. Here is a screen shot of what I have. I marquis selected every object, and then selected the shape tool to reveal all the nodes and vectors.

You can see the "successful" Trim jobs where the stars appear white. You can also see the green stars next to the ones that would not Trim properly. As you can further see, there are indeed node paths present from the trim procedure, but the black area inside the trim does not dissappear as it should.

To some extent this is academic, because the vectors are indeed there, and I assume they will cut. I simply don't understand why there is not a blank white star shape left like with the other "normal" trim procedures?
 

Attachments

  • ring2.jpg
    ring2.jpg
    31.6 KB · Views: 123

RedlineMan

New Member
So...

The end result is no one has any good ideas of why a trim function would leave the node path, but not take the color out of the trim, nor leave the trimmed piece (under the top item) as a seperate item if the curve is broken??

It has happened to me again, but I still have not figured out under what circumstances, or how to get around it.
 

vid

New Member
FWIW - Looks like your process is valid.

Check to make sure that the nodes on your remaining stars are closed paths.

Also check to see if there are two stars on top of each other trimming out your wreath.


I've had some quirkie things like that happen which has caused me some headbanging in the past. Had one file that acted like yours that I never figured out why it wouldn't play nice... tried combine, trim and any other button I could think of --- finally made the "hole" a white filled object to get it out of my life...........
 

javila

New Member
So...

The end result is no one has any good ideas of why a trim function would leave the node path, but not take the color out of the trim, nor leave the trimmed piece (under the top item) as a seperate item if the curve is broken??

It has happened to me again, but I still have not figured out under what circumstances, or how to get around it.

You are probably trying to trim too many things at once. Corel cannot read your mind.
 

RedlineMan

New Member
Thanks Vid;

Glad to know I'm not alone. I didn't think so. :Cool 2:

To reiterate -

1) I am only selecting two items; one the trimming piece, and the other the piece to be trimmed. I am not trying to trim multiple pieces at once.

2) I am carefully checking that there are no hidden items underneath, both by checking in wireframe mode, and by selecting the "wreath" and star in question, moving them aside, and marquis selecting the area they were in to see if there are any hidden nodes around. I am convinced there are no hidden items there.

Just one of those great mysteries I guess. At least it puts the vectors there so it will cut. I just have to remember that they are there because you can't see that it has been trimmed unless you select the item with the shape tool to expose the vectors.
 
Top