phototec
New Member
This has been discussed before however I just wanted to share how cheap and easy this is to do and it has made a big difference on my printer.
The adhesive strip of water proof daylight LED's are on sale for 50% off at $9.99, it came with the soldered-on connector and the 12V power supply is on sale 37% off for $6.27, and if your total purchase is at least $35 you get FREE shipping. So I ordered some other items I needed for my Harley to get the FREE shipping.
LE Lampux 12V Flexible LED Strip Lights, LED Tape, Daylight White, Waterproof, 300 Units 3528 LEDs, Light Strips, Pack of 16.4ft/5m
http://www.amazon.com/gp/product/B00HSF66JO/ref=oh_aui_detailpage_o00_s00?ie=UTF8&psc=1
JACKYLED New DC 12V 2A 2.0A Switching Power Supply Adapter For 110V- 240V AC 50/60Hz 2.1mm
http://www.amazon.com/gp/product/B006NTNGN0/ref=oh_aui_detailpage_o00_s00?ie=UTF8&psc=1
So for the cost of $16.26 I was able to add daylight LED's to my Roland SP-540V, I could never see the printing area very well when it was printing, the print head area was back a ways under the top cover, now the LED's shine brightly all the way across the print carriage area.
The 3M adhesive backed LED strip was 16.4 feet long and I only needed 70" so I have still have over 10' of LED's left over for another project. The way the LED strip is made, you can cut the LED strip anywhere you want between every 3 LED's, and it worked out perfect for my printer to cut it at 70".
I removed the left cover and there is about a 6" wide cavity on the left side of the printer, so I started applying the LED strip from the left side and stuck it to the bottom of the front/top cover (on the back side of the Roland logo), that way the light shines more towards the back. The pigtail connector goes into the cavity area and that's were I connected it to the mating connector of the power supply (wall-wart).
There are two round holes in the metal panel, right behind the left side plastic cover, so I feed the wire from the wall-wart into the hole on the left and then it connects to the pigtail connector on the LED strip. There is enough clearance so you can re-install the left side cover and it does not crimp the wire. Then you plug in the wall-wart and bingo you have a full width daylight balanced LED strip all the way across your printer.
Pretty sure this can be made to work with just about any printer for $16.26.
Attachments
-
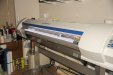 Roland SP-540V printer with 70 inches of daylight balanced LED's installed under front top cove.jpg61.3 KB · Views: 426
 -
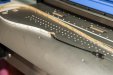 LED strip with connector cable from factory..jpg53 KB · Views: 293
 -
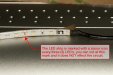 You can cut LED strip to almost any length..jpg63 KB · Views: 307
 -
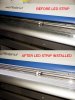 Before and After LED strip install.jpg67.8 KB · Views: 282
 -
 Left side cavity with power cord connection.jpg67.8 KB · Views: 281

 Yep, one of the best easy mods you can do on your printer. Did ours a couple of years ago. It does take quite a bit more effort but I also tied the power into the printers power so I would not have any extra cords hanging out and added an inline on/off switch to the front control panel for the lights on our Mimaki. You do need a multimeter and whatnot to do it this way. Since the Mimaki has 24V dc output on its power supply I went with a 24v strip for ours but different machines and brands might have different voltages available. You would also tie in to the 120v AC power coming into the printer and just hide the power brick for the LEDs under one of the machines covers as well.
 cheerz!