-
I want to thank all the members that have upgraded your accounts. I truly appreciate your support of the site monetarily. Supporting the site keeps this site up and running as a lot of work daily goes on behind the scenes. Click to Support Signs101 ...
You are using an out of date browser. It may not display this or other websites correctly.
You should upgrade or use an alternative browser.
You should upgrade or use an alternative browser.
Laminator disaster
- Thread starter chartle
- Start date
JBusch260
New Member
Not sure what you mean be advance the feed roll.
Sorry I should have worded that better. Ours gets reverse loaded, but if I have issues of those waves, sometimes advancing the feed (by giving it a lot of slack) straightens it up. But that's in cases of slightly crooked loading or if the material shifted oddly on the roll.
Latest update 2/13
All morning I have been trying to adjust the side to side roller pressure and thought I was making head way but not really.
Here is my latest question. How much tension to put on the material not the the lam the printed vinyl?
As a last resort, I just tried ramping up the tension on the front feed roller to pretty much the max and it seemed to help a lot. I tested how much tension I put on the vinyl. I released the roller pressure went behind the machine and gave it a yank. I had to give it good tug and put my weight into it to get it to move.
So the question is how much tension should I have? I was at another shop and they just had the material on a roll on the floor in a box in front of the machine and the only back pressure was them wiping the material to make sure there was no dust.
phototec
New Member
Not sure what you mean be advance the feed roll. As for uneven pressure I did just adjust it using my cobbled together force gauge. Its one of these with strips of banner material.
View attachment 96469
It was tight on the left side with it falling out on the right side. I got it to within 10 or so grams of force.
Did you purchase the WeiHeng Electronic Digital Portable Scale form ebay and it shipped from China?
If so how long did it take for shipping?
Or did you find one in the US?

Did you purchase the WeiHeng Electronic Digital Portable Scale form ebay and it shipped from China?
If so how long did it take for shipping?
Or did you find one in the US?
Got it from deal extreme, a chinese company, which has gotten better recently but its still a few weeks to a month.
They have some sort of US direct service thats a little faster but not sure if they have this item or anything like it in their US "store".
http://dx.com/p/1-0-lcd-portable-di...ple-15kg-max-5g-resolution-73322#.Uv0MIGI7vTo
For what its worth this one had the best resolution.
dypinc
New Member
Ok I have finally gotten back to the laminator issue. Right after I posted this I had about a month of horrible computer issues. I'm also the network engineer here and we had a server that crashed avery 19 hours day or night.
But anyway after having the laminate travel across the rollers about an inch per 20 feet I adjusted the pressure across the rollers. The lam is not moving a mm now but have another issue that just seemed to pop up.
Here is a video. I didn't want to waste lam so I just ran some left over release paper through it.
[video=youtube;keEecIuxJ_E]http://www.youtube.com/watch?v=keEecIuxJ_E&feature=youtu.be[/video]
I bought the front feeder and the rear power take up real for the laminator. I get everything straight and as you can see very quickly the left side starts to ride up as if the material was fed crooked. If I stop the machine I can slide it over to straighten it up but it just keeps moving over.
I'm I right in that maybe the front roller is messed up or maybe the pressure rollers are not square to the machine.
Thanks for everyones help. I didn't forget about you just I do a lot of stuff here.
That is pretty normal when you feed it incorrectly like that. You surely have an idler roller under your bottom pinch like you have on the top. Why aren't you using it?
Read this discussion for and understanding of how to properly web a laminator. Or how not to.
http://www.signs101.com/forums/show...or-eating-material-(yep-another-one-of-those)
SlightlyChilled
New Member
You need to call Grimco it's not on there site.
That is pretty normal when you feed it incorrectly like that. You surely have an idler roller under your bottom pinch like you have on the top. Why aren't you using it?
Read this discussion for and understanding of how to properly web a laminator. Or how not to.
http://www.signs101.com/forums/show...or-eating-material-(yep-another-one-of-those)
According to this from royal sovereign this how you load the material with the front roller accessory.
https://www.youtube.com/watch?v=_C87I3XhZ3U&feature=youtube_gdata_player
Here is how to load it without the front feeder.
https://www.youtube.com/watch?v=8JuKIku2IYU&feature=youtube_gdata_player
I've tried it this way and it doesn't work as well as what they show here. Because of the angle of the material and the way the left bracket works it tends to pop out.
I ran a hundred feet or so today with little issue. I wasn't puting enough tension on the material.
ETA: now that i think about it i tried to use that roller in just that way. the problem is that its not laid out like in the manual, it's much closer to the bottom roller right underneth it. I think in that other thread you refer to the manual. If you look at figure three around page 10 you can see how tight it is. I couldn't figure out how to get the material around that roller and back out. Monday I'll try to make a video showing the problem.
dypinc
New Member
I wonder why they would put videos out like that. It is a challenge to feed vinyl straight through like that. Yes the edge of the table helps a little but when you can web it around two rollers that all but eliminates those feed issues. They designed the top rollers to be webed properly but why did they designed the bottom rollers so you can't or is very difficult to web the printed vinyl that way. Printed vinyl is even more necessary to be webed so that it lays flat as it is going under the nip. And their manual shows to web it that way?
Here is a interesting video which shows the bottom idler roller and the table removed.
http://videos.mybinding.com/royal-sovereign-laminator-installation-of-front-feed-assembly-video/
Are you saying that bottom idler roller is actually tight against the bottom pinch roller? Even if it was that might not be a bad thing as long as you can get your vinyl through it and pull it straight and tight as you take it around the bottom pinch roller.
ETA: now that i think about it i tried to use that roller in just that way. the problem is that its not laid out like in the manual, it's much closer to the bottom roller right underneth it. I think in that other thread you refer to the manual. If you look at figure three around page 10 you can see how tight it is. I couldn't figure out how to get the material around that roller and back out. Monday I'll try to make a video showing the problem.
I did my best to Create a drawing on my tablet. This is how the rollers are laid out. The Blue path would be the way the material should be webbed, the red path is reality. You shove the material in and it just rides up the back. There is no room to get your fingers in there to try to pull the material through the two rollers.

P Wagner
--
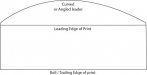
Using the lower idler roller is difficult due to limited space, but it is hardly impossible. Having a bit of space at the leading edge of the print media will help greatly, or failing that, using a leader that is curved or angled will limit the initial surface area passing around the idler roller, making it far easier to use.
Please see the attached drawing for a visual of this.
Please see the attached drawing for a visual of this.
Attachments
Not sure what you mean be advance the feed roll. As for uneven pressure I did just adjust it using my cobbled together force gauge. Its one of these with strips of banner material.
View attachment 96469
It was tight on the left side with it falling out on the right side. I got it to within 10 or so grams of force.
I bought a fish scale from Walmart. It has a dial gauge but considering how cheap this one is I think it is as good or better.
SlightlyChilled
New Member
I bought a fish scale from Walmart. It has a dial gauge but considering how cheap this one is I think it is as good or better.
Now you need to make something for the rollers to pull on....
Wow! Thanks for the drawing. That is just plain bad design. I would put some tape on the vinyl and tape it to the bottom idler and get it around that bottom idler roller one way or another.
Using the lower idler roller is difficult due to limited space, but it is hardly impossible. Having a bit of space at the leading edge of the print media will help greatly, or failing that, using a leader that is curved or angled will limit the initial surface area passing around the idler roller, making it far easier to use.
Please see the attached drawing for a visual of this.
Ok now that I'm back in the office I have attached some pics to show you what I'm dealing with.


 (wow I have hairy arms
 )
)Not a lot of room in there. The other issue is that removing the table is a major pain. You have to make sure the guides are locked down (or they slide off) and then you tilt the table up and completely remove it. On say a SEAL (the one we probably should have bought since the local dealer is 400 feet from my front door) the table stays attached and tilts up and away.
I'll think I'll stick with the way the video shows just with the right adjustments.
Now you need to make something for the rollers to pull on....
Not sure if this is the right way but this is what I did.
I made two pieces of banner material with grommets and put them on each end of the rollers. I closed the nip until the rollers touched with a little pressure. I then pulled on each one with steady force to get a steady reading.
I didn't pull them all the way out thinking that if one side didn't have something there it would apply more or less pressure on the other side.
Design it Graphics
New Member
Chartle, It's really not all too hard to run material between that once you get used to it. Yes it is poor design but I Recently went through this exact dilemma as you are, no one here even offered jack **** for advice except for calling me a noob or shoulda bought a seal haha.
Luckily I had a user from here shoot me a call, gave me some pointers and since I've been running average of 20-30 ft at a time, maximum of 75ft to date with 1/8th inch of walk.
Shoot me your phone number and when I'm not as busy I will shoot you a call. I will also try to find my post listing all of my information I found during my experimentation with the RS laminator.
OK got it around the roller and into the nip.


Now my issue is how do I end the job? Before when it was on the table I would use some left over backer paper as a leader.
After I finished the job, the best I could do has to raise the nip and slide some paper underneath the graphic. Maybe I need to add more to the back or is that front of the job and trim it off.
ETA: Just webbed another roll and no this is not going to happen unless I can come up with a way to get it turned around. I started to run out of swear words.