-
I want to thank all the members that have upgraded your accounts. I truly appreciate your support of the site monetarily. Supporting the site keeps this site up and running as a lot of work daily goes on behind the scenes. Click to Support Signs101 ...
You are using an out of date browser. It may not display this or other websites correctly.
You should upgrade or use an alternative browser.
You should upgrade or use an alternative browser.
Valuejet
- Thread starter Dave Stacey
- Start date
Print-Kwik
New Member
A small point but are most rolls 54"? If so, slitting them could be a pain...
maybe not for larger shops...
P
I just order my material slit to 51". I'm guessing as more of these come online, the suppliers will start offering rolls to fit.
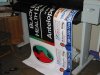
Pics from ValueJet
Here are some recent pics of jobs we've done with our ValueJet. Awesome vibrant colors & NO BANDING at all---ever!
Here are some recent pics of jobs we've done with our ValueJet. Awesome vibrant colors & NO BANDING at all---ever!
Attachments


Urban Image
New Member
Those look great. They're at 720 dpi, right?
Re: pics from valujet
Yes, they were printed at 720 dpi, but the designs were only 150 dpi. The colors are what are blowing us away on the ValueJet. They are so much more vivid than I've seen on other printers. We are getting some awesome feedback in our area from some wholesale customers we are doing work for who were using other companies in our area before. They are saying there is no comparison to the VJ's colors & sharpness.
BUT, never, never try to print directly on magnet material with the VJ!!!! I speak from the voice of experience here! It will totally mess up the heads! The VJ is not meant to print on magnets. Just a little FYI to hopefully save someone the headache we've gone through!
Those look great. They're at 720 dpi, right?
Yes, they were printed at 720 dpi, but the designs were only 150 dpi. The colors are what are blowing us away on the ValueJet. They are so much more vivid than I've seen on other printers. We are getting some awesome feedback in our area from some wholesale customers we are doing work for who were using other companies in our area before. They are saying there is no comparison to the VJ's colors & sharpness.
BUT, never, never try to print directly on magnet material with the VJ!!!! I speak from the voice of experience here! It will totally mess up the heads! The VJ is not meant to print on magnets. Just a little FYI to hopefully save someone the headache we've gone through!
slow printing?
Hey Valentino,
Ours goes very fast with 720X720. It will supposedly go even faster at 540X540. Also are you printing from a laptop? When we first got ours, we were using a laptop & it was sooooo slow! As soon as we started using a regular desktop, it went super fast. There's something about using a laptop that just doesn't work. Hope this helps.
Happy printing!
Teresa
S
Sign-Man Signs
Guest
We bought the Prism Jet Extra from Sign Warehouse and to date have had excellant results from the printer. Colors are real good for cmyk if you use 720 x 720 resoultion. What we are really having a problem with is the Graphtec vinyl cutter that they supplied with the Mutoh. For the life of us we can't get it to contour cut. It has a reader eye to follow contour line after printed but can't seam to make it do the job. We opted for the print and then send to cutter option because we didn't want to contaminate our printer head. Anyone have a suggetion on how to use the Graphtec?
Contour Cutting from Printer to cutter
Hello,
I think the following will help you. I followed exactly what it said, and did my first contour cut right off the bat.
1. The first Step is to add a contour line to your image. (This line shows as a light gray color and does not print. It just lets the cutter know where to cut). Select the image then select [Effects] then [Contour Cut].

2. The Contour options box should open in Design Central. Different distances can be set from negative numbers to positive numbers. Negative number contours are used for setting the cut within the print a little so there is no white edge even if the cut is slightly off. Positive contour to 0.000in puts the contour right on the edge of the graphic. Any larger number contour like 0.20 gives you a white space around your graphic.

3. You will see a gray contour cut line around the graphic. (Note: if the distance of the contour cut is set to 0.00 you will not be able to see the contour line because it will be on the very edge of the image). Also there is an option (With Holes) if this is checked it will also contour the insides of objects like the
insides of text . After the settings are to your liking click [Apply] (green check mark on the bottom right of design central).

4. Open the Rip/Print window and go to the advanced tab. Click on the [Contour] button at the bottom right of the window.

5. In the Contour options window you need to set a few options. On the top left of the window you need to make sure it shows the correct vinyl cutter (FC-7000 or Q-series cutter). Over on the right set the Registration mark to (Graphtec type 1 automatic). Also check the option [One set for all copies]. Make sure a check is put next to [Advance after plot]. Also put a check next to [Optimize cutting order] also set the number to 100.000in. At the bottom left of the screen make sure Send: is set to (As separate jobs).

6. Next Click [Cutter Driver Options] on the bottom right of the screen. Make sure below the Before Job tab the option is set to (None). This will keep the software from overriding the cutters settings. Click [APPLY] then [OK]. Then click [Done] on the Contour Options screen.

7. Go back to the General tab in the Rip & Print window. You can now see 4 registration marks around the image. Notice that by default flexi sets the image position 4 inches from the left and 1.0 inches up.This is to give room for the pinch rollers on the vinyl cutter. The rollers must be outside the registration marks.

8. Go to the Panel tab. Click on the handles (little boxes around the graphic) & pull them out slightly to create more of a margin on the sides of the graphic. This helps to make sure the actual registration marks are not to close to the graphic which would cause the cutter to miss the registration marks when scanning for them.

9. The image is now ready to be printed. Make sure you have all of the correct media settings for what type of material you are printing on. Click on [SEND] the print job will begin to print and the contour cut job will be holding next the cutter listed in the production manager Queue.
10. After print Job is done printing give it some time for the ink to cure enough to handle the material (About 20 minutes on gloss material). Then Cut the print off of the printer leaving about 5 or so extra inches of space after the back registration marks. Load the material so the print is facing the same way it came out of the printer. For Example" If you printed an arrow that is pointing towards you it needs to point towards you when it is loaded in the vinyl cutter".
11. Bring Production Manager to the front (Press Green and Purple Gear Icon). Highlight the Vinyl cutter listed on the left side of Production Manager. Select the cut job that is holding then click on the send icon.

12. After pressing the send icon a message box pops up on the screen "Please place the pen/knife to the mark, then press Origin on control panel to set the new origin" .

13. Use the Directional Arrow buttons on the Vinyl Cutter's Control Panel to move the tip of the blade into of the front right registration mark. As Shown below:


14. Press the [ORIGIN] button on the Vinyl Cutter to set the new origin. You will hear 3 beeps from the machine when you do this. Next go back to the computer and click on [OK] (message show on step 12). The Vinyl cutter will now begin to scan all 4 of the registration marks. After all 4 marks are detected the vinyl cutter will begin cutting.
Hello,
I think the following will help you. I followed exactly what it said, and did my first contour cut right off the bat.
Contour Cutting from Flexi Pro 8.0
Using the Graphtec FC-7000/CE-3000 MKII/
Vinyl Express Q-series (RMS Option installed)
Using the Graphtec FC-7000/CE-3000 MKII/
Vinyl Express Q-series (RMS Option installed)
2. The Contour options box should open in Design Central. Different distances can be set from negative numbers to positive numbers. Negative number contours are used for setting the cut within the print a little so there is no white edge even if the cut is slightly off. Positive contour to 0.000in puts the contour right on the edge of the graphic. Any larger number contour like 0.20 gives you a white space around your graphic.
3. You will see a gray contour cut line around the graphic. (Note: if the distance of the contour cut is set to 0.00 you will not be able to see the contour line because it will be on the very edge of the image). Also there is an option (With Holes) if this is checked it will also contour the insides of objects like the
insides of text . After the settings are to your liking click [Apply] (green check mark on the bottom right of design central).
4. Open the Rip/Print window and go to the advanced tab. Click on the [Contour] button at the bottom right of the window.
5. In the Contour options window you need to set a few options. On the top left of the window you need to make sure it shows the correct vinyl cutter (FC-7000 or Q-series cutter). Over on the right set the Registration mark to (Graphtec type 1 automatic). Also check the option [One set for all copies]. Make sure a check is put next to [Advance after plot]. Also put a check next to [Optimize cutting order] also set the number to 100.000in. At the bottom left of the screen make sure Send: is set to (As separate jobs).
6. Next Click [Cutter Driver Options] on the bottom right of the screen. Make sure below the Before Job tab the option is set to (None). This will keep the software from overriding the cutters settings. Click [APPLY] then [OK]. Then click [Done] on the Contour Options screen.
7. Go back to the General tab in the Rip & Print window. You can now see 4 registration marks around the image. Notice that by default flexi sets the image position 4 inches from the left and 1.0 inches up.This is to give room for the pinch rollers on the vinyl cutter. The rollers must be outside the registration marks.
8. Go to the Panel tab. Click on the handles (little boxes around the graphic) & pull them out slightly to create more of a margin on the sides of the graphic. This helps to make sure the actual registration marks are not to close to the graphic which would cause the cutter to miss the registration marks when scanning for them.
9. The image is now ready to be printed. Make sure you have all of the correct media settings for what type of material you are printing on. Click on [SEND] the print job will begin to print and the contour cut job will be holding next the cutter listed in the production manager Queue.
10. After print Job is done printing give it some time for the ink to cure enough to handle the material (About 20 minutes on gloss material). Then Cut the print off of the printer leaving about 5 or so extra inches of space after the back registration marks. Load the material so the print is facing the same way it came out of the printer. For Example" If you printed an arrow that is pointing towards you it needs to point towards you when it is loaded in the vinyl cutter".
11. Bring Production Manager to the front (Press Green and Purple Gear Icon). Highlight the Vinyl cutter listed on the left side of Production Manager. Select the cut job that is holding then click on the send icon.
12. After pressing the send icon a message box pops up on the screen "Please place the pen/knife to the mark, then press Origin on control panel to set the new origin" .
13. Use the Directional Arrow buttons on the Vinyl Cutter's Control Panel to move the tip of the blade into of the front right registration mark. As Shown below:
14. Press the [ORIGIN] button on the Vinyl Cutter to set the new origin. You will hear 3 beeps from the machine when you do this. Next go back to the computer and click on [OK] (message show on step 12). The Vinyl cutter will now begin to scan all 4 of the registration marks. After all 4 marks are detected the vinyl cutter will begin cutting.
Urban Image
New Member
I'm surprised they didn't offer you the ValueJet/Ultima bundle instead.
Urban Image
New Member
A couple of minutes ago I put out a 3x5 and clocked it at 11 minutes at 720x720. If I put it at 540 it runs faster than I do.
Urban Image
New Member
That is pretty good, about 82 SFPH. I've got my SP-540V outputting 64 SFPH at 720x720.
That's counting the time it took to process the file. The image was a full color shot of the interior of a cathedral.