-
I want to thank all the members that have upgraded your accounts. I truly appreciate your support of the site monetarily. Supporting the site keeps this site up and running as a lot of work daily goes on behind the scenes. Click to Support Signs101 ...
You are using an out of date browser. It may not display this or other websites correctly.
You should upgrade or use an alternative browser.
You should upgrade or use an alternative browser.
The Man Cave project
- Thread starter SignManiac
- Start date

SignManiac
New Member
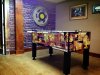
Recent New Years day additions. Full foosball table wrap, gear wall piece that will be a wall clock. I'm waiting on an antique brass clock face to show up. And a custom wall storage wrack for my ping pong paddles.
Attachments

Gino
Premium Subscriber
This place is crazy neat...... and then some.
I just had a flashback and thought I'd share. Ya have all those neat games and toys...... and it looks like there's gonna be a lota after hours fun and partying. If I remember correctly, you have a fridge somewhere which will hold all the libations and suds. You'll probably stock this place well. If memory serves me, those conditions sometimes need carpeting on the floor to take the hurt out of falling or dropping your head too close to the floor, especailly a hardwood floor. Are you gonna put some soft things on the floor to cushion hefty party animals ?? Or just kick/sweep/roll 'em back to the bay area and let 'em figure it out in the morning ??

I just had a flashback and thought I'd share. Ya have all those neat games and toys...... and it looks like there's gonna be a lota after hours fun and partying. If I remember correctly, you have a fridge somewhere which will hold all the libations and suds. You'll probably stock this place well. If memory serves me, those conditions sometimes need carpeting on the floor to take the hurt out of falling or dropping your head too close to the floor, especailly a hardwood floor. Are you gonna put some soft things on the floor to cushion hefty party animals ?? Or just kick/sweep/roll 'em back to the bay area and let 'em figure it out in the morning ??
SignManiac
New Member
You are correct Gino ") I'm going to put in some leather couches in the lounge area for those to drunk to stand up. They can just fall onto the couch! I can't afford to risk the liability
I'm going to put in some leather couches in the lounge area for those to drunk to stand up. They can just fall onto the couch! I can't afford to risk the liability
I'm going to put in some leather couches in the lounge area for those to drunk to stand up. They can just fall onto the couch! I can't afford to risk the liability SignManiac
New Member
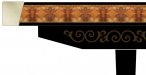
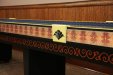
Just another update. Got the wainscoting and chair rail up last weekend and will finish base board this coming weekend. Here's my concept for the shuffleboard table restoration. I'll refinish all the wood and shoot with a Matthews satin black. Digital print the copper metal design. and applique the scroll work down the sides in routed 1/8" PVC. I plan to plane down the top of the maple board to bare wood and v-carve the scoring numbers and lines back into the surface. After that I'll seal it and wax it. There's an electronic score board that plan to redo and install as well.
It's all just smoke and mirrors cosmetic but from a distance it should look pretty cool.
It's all just smoke and mirrors cosmetic but from a distance it should look pretty cool.
Attachments


SignManiac
New Member
Okay, so I just finished my shuffleboard restoration project. Here are a couple of before and after photos along with my faux truss room dividers. I took the entire table apart, sanded and painted the tray and rails. The scrolls are Matthews metallic copper. The metal sides are UV flatbed printed tiles on brushed aluminum polymetal. I fabricated the shell design trapazoid pieces. I made and upholstered the inside tray liners. I resurfaced the solid wood playing surface on the router table then stained it a deep ebony. Sanded and clear coated the entire board after fill in the carved score lines and numbers. I used brass tacks along the side and top rails to give it some added dimensional details.
It was a fun project and really is the centerpiece of my man cave!
It was a fun project and really is the centerpiece of my man cave!
Attachments
-
 shuffleboard before.jpg51.2 KB · Views: 114
 -
 shuffle new-01.jpg45.4 KB · Views: 121
 -
 shuffle new-2.jpg52.1 KB · Views: 116
 -
 shuffle new-3.jpg48.5 KB · Views: 131
 -
 shuffle new-4.jpg109.1 KB · Views: 130
 -
 shuffle new-5.jpg50.1 KB · Views: 130
 -
 shuffle new-6.jpg87.1 KB · Views: 123
 -
 Truss-01.jpg72.9 KB · Views: 137
 -
 Truss-02.jpg55.1 KB · Views: 133
SignManiac
New Member
Silicone spray!
SignManiac
New Member
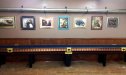
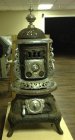
I'm actually spending more time in the evenings in it. I do an open house on Thursday nights and the other nights I just go and shoot pool for an hour or so to keep my game sharp. I just acquired a 2005 Golden Tee arcade game that I will also trick out. But won't get to that until I finish my next two projects. The antique parlor stove and then my Brunswick pool table. I'm taking a month break so I can just enjoy playing in it now.
SignManiac
New Member

SignManiac
New Member
Recent update
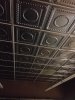
My latest project update that I worked on over Thanksgiving. About 2k s.f. of embossed tin ceiling panels. This stuff has really sharp edges and being overly confident of my skills and refusing to wear gloves, gave me a few minor slices here and there. The grid is currently white but I'm going to paint them all black over Christmas to finish it off. Next is my antique parlor stove. I have it taken apart and will sandblast it down to bare metal, then shoot it with a jade green hi-temp paint. I'm changing all the bright work from nickle to copper when its done.
Hard to believe I'm two years into this project and still not half way near finished!!
Attachments

SignManiac
New Member
Haha, don't be jealous. This has turned into one of those relationships where you realize it's getting pretty heavy but you know you can't get out of it. This could be a long, long, addiction for someone like me!
synergy_jim
New Member
You need a big rusty gear hanging on the wall.... wink wink....
Gino
Premium Subscriber
My latest project update that I worked on over Thanksgiving. About 2k s.f. of embossed tin ceiling panels. This stuff has really sharp edges and being overly confident of my skills and refusing to wear gloves, gave me a few minor slices here and there. The grid is currently white but I'm going to paint them all black over Christmas to finish it off. Next is my antique parlor stove. I have it taken apart and will sandblast it down to bare metal, then shoot it with a jade green hi-temp paint. I'm changing all the bright work from nickle to copper when its done.
Hard to believe I'm two years into this project and still not half way near finished!!
Wow, did you router/cnc those panels for the faux tin ceiling.... or is it an actual tin ceiling ??
Our family room has that effect, but it's faux embossed and was painted to look authentic. It's a really neat look to a ceiling.
Neat looking potbelly stove.

Chriswagner92
New Member
I was thinking about doing that tiling on my ceiling in my new house, this makes me want it even more. How hard was the install?